Spider Plant (Chlorophytum Comosum)
Scientific Name: Chlorophytum Comosum
You might be looking for a houseplant that adds a touch of green to your living space and helps purify the air. Look no further than the popular and hardy Spider Plant, a versatile and low-maintenance option for indoor gardening. This attractive plant offers numerous benefits for your home – from improving air quality to being a safe option for pet-friendly households.
Spider Plant care is such an easy plant to grow and care for, making it perfect for beginners. If you are looking for an easy plant, then a Spider Plant may be for you.
To give this Spider Plant the best care, it requires well-draining soil, water the plant when the soil is dry, provide it with bright indirect sunlight, temperatures ranging from 65-75F, and average to high humidity levels.
Quick Care Overview
| Common Name | Spider Plant |
| Scientific Name | Chlorophytum Comosum |
| Family | Asparagaceae |
| Origin | South Africa |
| Growth Rate | Fast |
| Identification | Green and white leaves with plantlets trailing |
| Height | Up to 10 feet in length |
| Soil | Well-draining soil |
| Water | Water when the soil is dry |
| Temperature | 65-75F |
| Sunlight | Bright indirect sunlight |
| Toxic to Cats & Dogs | No |
| Toxic to Humans | No |
| Pests | Spider mites, aphids, whitefly |
| Diseases | Root rot |
Below we will dive deep into this Spider Plant care guide.
Spider Plant History
Spider plants, scientifically known as Chlorophytum Comosum, have a fascinating history. Originating from South Africa, they eventually made their way to other parts of the world, becoming a popular houseplant.
In their natural habitat, spider plants thrive in subtropical and tropical regions. They are found in areas with moderate rainfall, such as forest floors, riverbanks, and grasslands.
During the Victorian era, spider plants first gained recognition as houseplants in Europe and America. As people became fascinated with exotic plant species, these plants earned a place in many homes due to their adaptability and unique appearance.
Spider Plant Identification
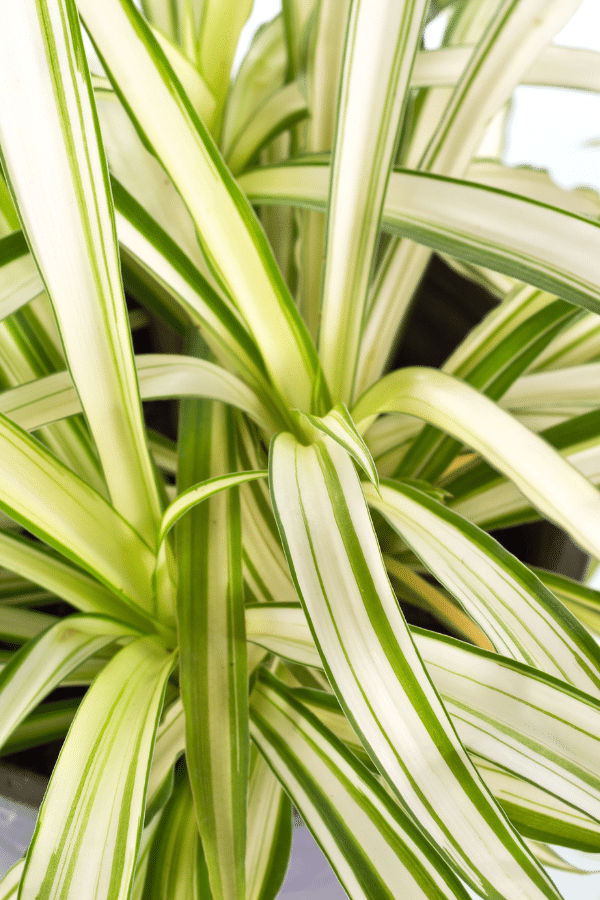
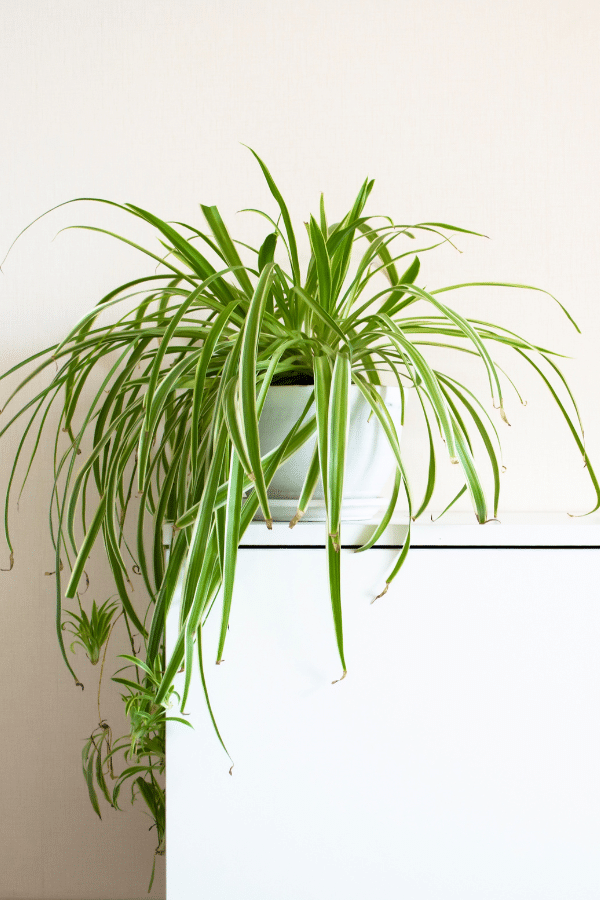
When identifying a spider plant, look for the distinct features of its leaves and stems. The foliage of these plants is easily recognizable, as they typically consist of long, arching leaves that form a dense, grass-like appearance. The leaves can be solid green or have white stripes, which is the vittatum variety. This results from the green margins being interrupted by lengthwise stripes along the foliage. For a simpler look, consider the solid green spider plant. This variety has solid green leaves without any striking patterns or variegation.
Spider Plant Growth Facts
Spider plants, also known as ribbon plants, airplane plants, or spider ivy, grow really fast, creating tiny plantlets, or “spiderettes,” growing from the main plant’s stems. These can be cut for propagations. They have a cascading effect that looks great in hanging baskets or placed on a high shelf.
How Big Does a Spider Plant Get?
As a Spider Plant parent, you can expect your spider plant to reach a mature size of 12 to 24 inches in height and width. The length of the leaves may vary, but they can grow up to 18 inches long.
As the plant develops, it will produce hanging stems called “spiderettes” or “plantlets,” which will increase the overall width and length of the spider plant. These plantlets can be propagated to create new plants, helping you expand your spider plant collection or make your pot more full.
Spider Plant Care
Providing the right environmental conditions for your spider plant to grow to its full potential is vital. Position your spider plant in bright, indirect sunlight and ensure it has well-draining soil. Regular watering is crucial, but let the soil dry between waterings to prevent root rot.
To maintain the health of your mature spider plant, you may want to consider the occasional pruning. Trim the leaves and remove any damaged or dead parts to keep the plant looking good and encourage new growth. This process enables your spider plant to grow even bigger over time.
Spider Plant Soil
When choosing soil for your spider plant, it is essential to select a well-draining, slightly moist mixture. Spider plants prefer slightly dry soil, so avoid overwatering and allow the top inch of soil to dry between waterings.
A suitable soil mixture for spider plants should include a balance of well-drained soils, such as peat moss or coco coir and perlite or vermiculite. This mixture improves drainage and reduces the risk of root rot while retaining enough moisture to support the plant’s needs. You may also consider adding compost to your spider plant’s soil. Incorporating compost into the mixture provides essential nutrients and helps improve soil structure.
Spider Plant Fertilizer
Fertilizing your spider plant is a key step in maintaining its health and vibrancy.
When applying fertilizer, consider choosing one that’s specifically formulated for houseplants.
A balanced, water-soluble fertilizer such as 10-10-10 (equal parts nitrogen, phosphorus, and potassium) is ideal for your spider plant. I like to dilute the fertilizer to half the recommended strength to avoid over-feeding or burning the plant.
Follow the instructions on your specific fertilizer, but I am able to give my Spider Plant this fertilizer every other time I water in the spring and summer (fall and winter too if the plant is still producing new growth).
Spider Plant Watering
To make sure your spider plant thrives, watering it correctly is very important. Spider plants prefer consistent moisture, but they don’t like to be overly damp. You should water your spider plant when the top inch of soil feels dry. Always empty the saucer under your plant after watering to prevent any potential root rot issues.
Your spider plant will thrive if you use the right type of water. I don’t like to use tap water as it contains minerals, chlorine, and fluoride, which can build up in the soil and create issues with your plant’s health.
Using rainwater is a natural and eco-friendly option for watering your spider plant. Rainwater is free of added chemicals and can provide your plant with beneficial nutrients. Collecting rainwater in a bucket or barrel makes it easily accessible – just be sure to cover the container to prevent mosquitoes from breeding.
Distilled water is also an excellent option for your spider plant. It’s free of minerals and added chemicals, meaning it’s unlikely to cause any issues or imbalances in your soil. You can find distilled water in most grocery and convenience stores.
While these two options are the best, a more practical option may be filtered water from your refrigerator. While this is tap water ran through a filter, it is still better than using plain tap water.
Spider Plant Light Requirements
Spider plants are versatile when it comes to light requirements. While they can adapt to various light conditions, understanding their native environment can help you to give them the best lighting conditions.
Direct sunlight is not the best choice for spider plants, as it can cause their leaves to scorch and lose their vibrant green appearance. Instead, place your spider plant in a bright location with indirect light. This type of light promotes healthy growth without causing harm to the foliage.
A bright, indirectly lit spot near a north or east-facing window is an excellent location for your spider plant. However, these hardy plants can also tolerate low light conditions. Spider plants are very forgiving, so if your living space doesn’t receive much natural light, a spider plant can still thrive, albeit at a slower growth rate.
Spider Plant Temperature & Humidity
When it comes to temperature, spider plants prefer a comfortable and consistent environment. Ideally, you should aim to keep the temperature between 65-75°F (18-24°C) during the day and slightly cooler at night.
If your spider plant is exposed to temperatures below 50°F (10°C) for a prolonged period, it may suffer damage. However, if it’s been outside for the summer and temps dip into the 50s at night heading into fall, it has a great chance of surviving. Just bring your plant inside before it frosts.
Humidity is also an essential factor to consider for your spider plant’s health. These plants thrive in a higher humidity environment, around 60-70%. However, they can adapt to lower humidity levels if necessary. To increase humidity, you can place a tray of water near your plant or use a humidifier.
Low humidity conditions can cause the spider plant’s leaf tips to turn brown, which typically indicates that the plant is losing moisture faster than it can absorb it. To help your spider plant adapt and thrive in low humidity, ensure it has adequate watering and use a moisture-retaining potting mix.
Repotting Spider Plant
When your spider plant outgrows its current pot, it’s time to give it a new home. Repotting provides the plant with more room to grow and promotes better root development and overall health.
First, prepare the new pot by ensuring it’s clean and has enough drainage. Choose a container that is 1-2 inches larger in diameter than the current one. This will give your Spider Plant ample room to expand without being overwhelmed.
Next, fill the new pot with a high-quality potting mix that provides good drainage. Adding perlite to the mix is great for aeration. Fill the pot about 1/3 of the way full, creating a small pocket in the center for the Spider Plant to lay.
Carefully remove the spider plant from its current pot. You can turn the pot upside down and gently tap it until the plant slides out. Inspect the root system for any signs of damage or disease, and trim away any dead or unhealthy roots.
Once the plant is free, place it into the new pot, making sure the base of the plant sits on the pocket of soil. Then, fill the rest of the pot with more potting mix, leaving about an inch of space at the top to allow for watering. Pat the soil down firmly, but avoid compacting it to ensure proper air circulation.
Finally, water your repotted Spider Plant thoroughly to help the roots establish themselves in their new environment. Place the pot in a bright, indirectly lit area and continue with your regular care routine.
Spider Plant Maintenance & Pruning
Caring for your spider plant is quite simple, but since it can grow so quickly, there is some pruning you need to do in order to keep the plant under control.
As with other plants, pruning plays a significant role in maintaining your spider plant’s appearance and health. Regularly remove dead or damaged leaves by trimming them off with clean, sharp scissors. Prune close to the base of the leaf, taking care not to damage the plant’s crown.
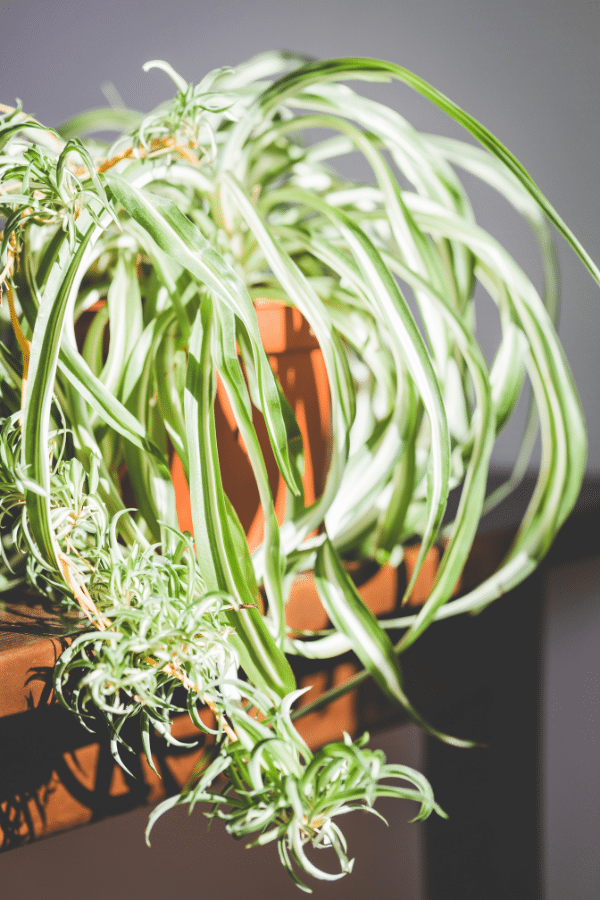
As your spider plant matures, it will start producing “baby” plants, or plantlets, at the end of long stems. These plantlets can be chopped and propped to produce new plants. It’s fun to give these to friends and family or you can root them and place them back into your pot to create a really full Spider Plant pot.
Spider Plant Propagation
Spider Plants are super easy to propagate! All you have to do is cut a planlet off the mother plant and either plant it in soil or place it in a jar of water to let it grow roots. Once it roots, you can plant it in soil to give it some nutrients. Propagating Spider Plants is such a fun way to share plants with others. Get a Spider Plant here off Etsy and before you’ll know it, you’ll be able to start propagating it!
Spider Plant Toxicity
Spider Plants are indeed non-toxic to cats and dogs, as identified by the ASPCA. However, this doesn’t mean your pets should freely graze on them. If your furry friends happen to chew on the leaves, they might experience some mild discomforts, but they shouldn’t be life-threatening.
Some possible symptoms your pet may exhibit after ingesting spider plant leaves include vomiting, diarrhea, and/or excessive drooling.
It’s always best to be proactive and place your Spider Plants in an area where it’s difficult for pets to reach which can be really easy to do as they do best in hanging baskets.

Spider Plant Problems
Spider Plant Leaves Turning Yellow
If you notice your spider plant’s leaves turning yellow, it could be due to a few common issues.
Firstly, overwatering can cause the roots to become waterlogged, restricting their ability to take in nutrients, leading to yellowing leaves. To avoid this, only water your plant when the top inch of soil feels dry and ensure your pot has appropriate drainage.
Another possible reason for yellowing leaves is tap water which contains chlorine. Chlorine can have a negative impact on your plant’s overall health. To avoid this issue, let tap water sit out for 24 hours before using it to water your plant, as this will allow chlorine to dissipate. Alternatively, you can use filtered or purified water.
Keep an eye on the lighting your spider plant receives, as excessive direct sunlight can cause the leaves to burn and become yellow. Ensure your plant is placed in a bright area with indirect light so it can thrive without the risk of sunburn.
Lastly, your spider plant could be lacking essential nutrients, leading to yellowing leaves. Regularly applying a balanced liquid fertilizer during the growing season can help maintain your plant’s nutritional needs and prevent any deficiencies.
Spider Plant Leaves Turning Brown
If you notice your spider plant’s leaves turning brown, there could be a few reasons for this issue. We will discuss some common causes and how to fix them to maintain a healthy plant.
One of the main reasons for brown leaf tips can be over-fertilization. Spider plants do not require excessive amounts of fertilizer. If you’ve been heavy-handed with the feeding, the excess salt in the soil can cause the leaf tips to turn brown. To resolve this, reduce your fertilizing frequency and make sure to use a water-soluble fertilizer diluted according to the package instructions.
Another common cause for brown leaf tips is low humidity. Spider plants prefer moderate humidity levels, and being in a dry environment can result in the tips of the leaves turning brown. You can remedy this by misting the foliage with water, setting a humidity tray near the plant, or using a humidifier to raise the humidity in the room.
Underwatering or overwatering your spider plant can also lead to brown leaf tips. Ensure that you are providing the right amount of water by allowing the top inch of soil to dry out between waterings. When you water the plant, thoroughly soak the soil and ensure proper drainage to avoid waterlogged roots.
Another aspect to consider is the quality of the water you’re using for your plant. Tap water containing high levels of chlorine and fluoride can cause the tips of the leaves to turn brown. A solution to this issue is to use distilled or filtered water for watering, or simply let the tap water sit overnight to allow chlorine to evaporate.
Lastly, exposure to direct sunlight can cause leaf burn, leading to brown leaf tips. Spider plants prefer bright, indirect light. Ensure that your plant is not positioned in a location where it receives intense, direct sunlight for extended periods.
Spider Plant Diseases
As a spider plant owner, you most likely won’t encounter many plant diseases, but the one you might is root rot. This condition usually occurs when the soil around your spider plant is consistently wet or soggy, causing the roots to rot. Symptoms of root rot include yellowing leaves, wilting, and an overall decline in the plant’s health. To prevent root rot, ensure proper drainage by using a well-draining potting mix, and avoid overwatering your spider plant until the soil has completely dried out. Make sure the pot you’re using has drainage holes, so excess water can escape.
Spider Plant Pests
Spider plants are generally hardy and resistant to many diseases, but they can still be affected by various pests. Spider mites, whiteflies, and aphids can affect the Spider Plant.
Spider mites are a tiny, common pest that can infest spider plants. They can be brown or white bugs crawling and the eggs look like white dust specs. They are usually found on the undersides of leaves and can cause discoloration, speckling, or webbing. To control spider mites, you can use an insecticidal soap once or twice a week for a full month to completely get rid of the egg cycle.
Whiteflies are small, white-winged insects that can be found on the underside of spider plant leaves. They can cause yellowing and wilting. To help manage a whitefly infestation, try using yellow sticky traps. Neem oil can also be effective for controlling whiteflies.
Aphids are small, soft-bodied insects that feed on plant sap, causing distorted growth, leaf yellowing, and a sticky residue. You can remove aphids from your spider plant by wiping them off with a damp cloth or using a forceful spray of water. Use an insecticidal soap containing neem oil to get rid of them for good.
It is crucial to manage infestations before they get out of hand, as insect pests can quickly cause severe damage to your spider plant. Always monitor your plant’s health and take action if you notice signs of pests.

